Have Additional Questions? Contact Us: info@cardiag.com
DAF EURO 6 AdBlue Emulator is compatible with EURO 6 DAF EAS-3 vehicle series manufactured from 2014 to the 2017 year. This installation manual describes the whole process of AdBlue Emulator device installation on compatible DAF EURO 6 vehicles. We highly recommend you to delete all DTC (Diagnostic Trouble Codes) errors from the OBD (On-Board Diagnostics) system. The best option is to use DAF VCI 560 diagnostic scanner. Also, it is recommended to check the OBD system after installation of the AdBlue Emulator module because there might be errors related to installation procedures.
DAF EURO 6 AdBlue Emulator VIN programming
DAF EURO 6 AdBlue Emulator installation
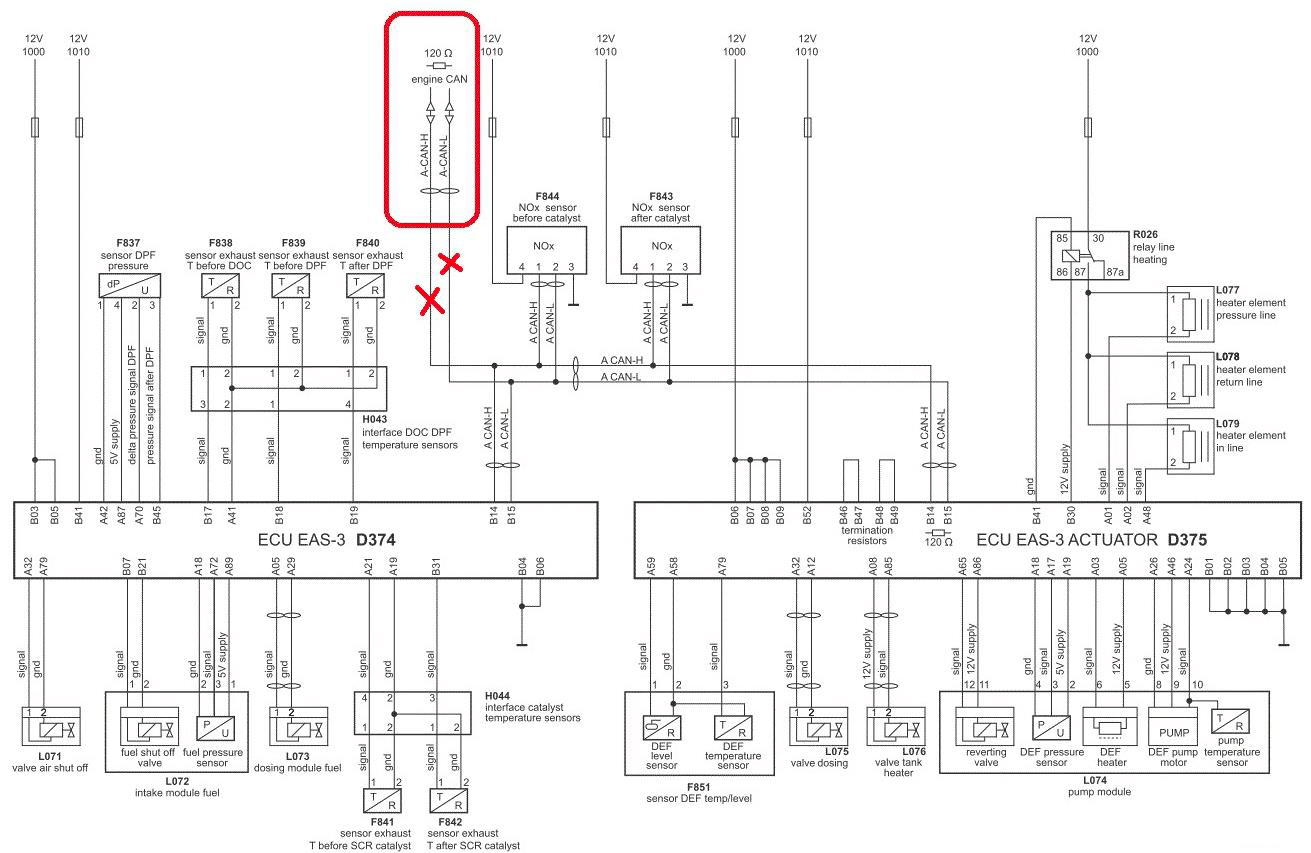
To install the AdBlue Emulator module on your DAF EURO 6 vehicle, you need to connect it to the CAN line of the truck at any comfortable point (see the diagram). Also, you need to connect the constant power supply to the module (30 terminal) and disconnecting the power supply from the EAS-3 system and its components.

An EAS-3 system and its components are powered with the following fuses: D25(E444, 10A) and D26 (E443, 20A).
If you are connecting the module in the truck cabin, you have to set the wires from A-CAN to the module connection place in the cabin. And you have to remove both fuses: D25(E444, 10A) and D26 (E443, 20A). If you are connecting the AdBlue Emulator module to the EAS-3 connector, you have to remove only D26 (E443, 20A) fuse and another fuse must stay in because this module requires a constant power supply.

Connection to the CAN-A line of the truck is possible from the EAS-3 connector or connectors of NOx sensors.
Wirring
| Truck wire | Adblue emulator wire | Type |
|---|---|---|
| Rose | Yellow | CAN High |
| Yellow | Green | CAN Low |
| Red | Power +5-24 volt | |
| Black | Ground |
Remove error codes with diagnostic software after module connection.


